Remotely log data
Collect data directly on a Wireless Sensor instead of a computer or mobile device.
Note
Remote logging is only available for PASCO Wireless Sensors. All Wireless Sensors support remote logging except for the following:
Set up remote logging
-
Open SPARKvue, or click
 and select Start New Experiment.
 -
Click Remote Logging:
-
Turn on the sensor. In the list of available devices, click the sensor which matches your sensor's device ID.
-
Configure remote logging for each sensor:
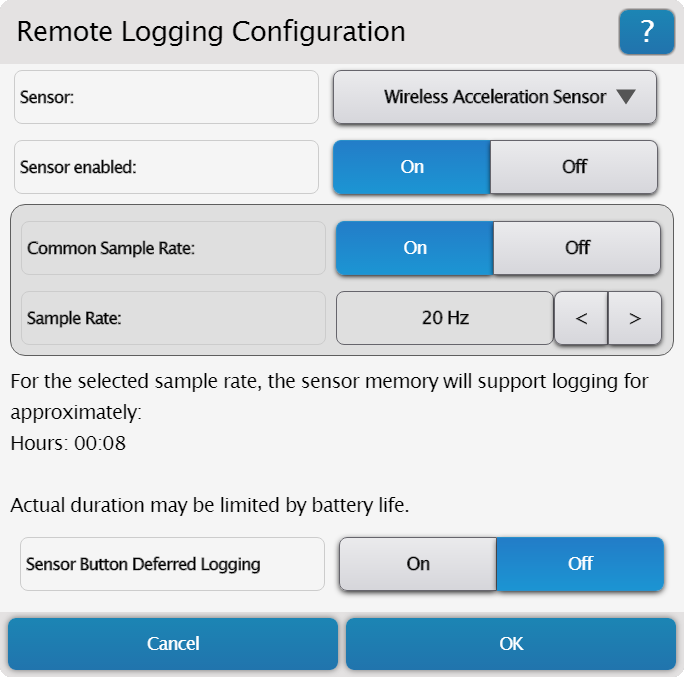
- Select a sensor to configure from the Sensor menu.
- Toggle Sensor Enabled to Off if you don't want to log data with this sensor.
- Set the Sample Rate using the left and right arrows. Toggle Common Sample Rate to Off to set different sample rates for each sensor.
Tip
The configuration window indicates the amount of time that the sensor can log data below the sample rate. To increase the logging time:
- Decrease the sample rate.
- Disable unused sensors.
-
Optional: Toggle Sensor Button Deferred Logging to On to make the sensor wait to begin data logging until you press the sensor's power button.
-
Click OK.
Data logging begins immediately after you click OK, or after you press the power button on the sensor if you selected Sensor Button Deferred Logging. The Bluetooth Status LED blinks yellow and green until data logging begins. When the sensor starts logging data, the Bluetooth Status LED blinks yellow.
Click OK and close SPARKvue. To stop data logging, turn off the sensor or connect it to SPARKvue to download the data.
Download remotely logged data
Download data remotely logged on a Wireless Sensor for data analysis. You can download the data to multiple devices as long as data isn't deleted from the sensor after downloading it.
-
Open SPARKvue, or click
and select Start New Experiment. -
Click Remote Logging:
-
Turn on the sensor, or press the power button if the sensor is currently logging.
Note
The sensor doesn't appear in Wireless Devices while the Bluetooth Status LED is blinking yellow. Press the power button to make the sensor appear.
Tip
If possible, connect the sensor via USB to download data at a faster rate.
-
Select the sensor under Sensors with data.
-
In the Logged Data window, select Download Data.
-
In the Select Measurements for Templates panel, select
 up to three measurements to display.
 -
Select a method to download the data:
-
Templates
Use this method to download the data into a new file.
In the Templates panel, select a template to display the selected measurements.
-
Quick Start Experiments
Use this method to download the data to a new Quick Start Experiment file. Names of Quick Start Experiments appear if any are available for the connected sensor.
Select a Quick Start Experiment from the list, if available.
-
Add to existing experiment
Use this method to download the data to an existing experiment file.
-
Click Open PASCO Experiment or Open Saved Experiment.
-
Select a file to open.
-
-
Note
It may take a few minutes to download the data depending on the amount of data logged.