Set up a recording condition
Use recording conditions to automatically start or stop data collection.
Recording conditions can be used to control when data recording starts and stops based on a measurement or time value. You have the option to set start and stop conditions simultaneously or individually. You can also mix the types of recordings used for starting and stopping data recording, such as setting a measurement based start condition and a time based stop condition.
Start conditions
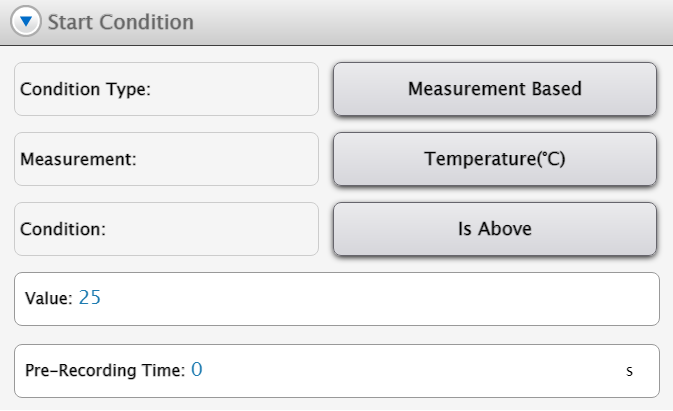
Measurement based
Use this condition to control when data recording begins based on a specific measurement value. For example, you can configure data recording to begin when a sensor measurement passes the set value.
- From the Experiment Screen, click
 .
. - Click the box next to Sensor to select the sensor you want to create a start condition for, or select Common Sample Rate if you want to set the same start condition for all sensors.
- Click Start Condition to open the start condition submenu.
- Click the box next to Condition Type and select Measurement Based.
- Select a measurement for the start condition by clicking the box next to Measurement and selecting an option from the list.
-
Click the box next to Condition to select one of the following condition types:
-
Rises Above
Recording begins when the measurement changes from below the entered value to above the entered value.
-
Falls Below
Recording begins when the measurement changes from above the entered value to below the entered value.
-
Is Above
Recording begins when the measurement is above the entered value.
-
Is Below
Recording begins when the measurement is below the entered value.
-
-
Enter a Value for the condition. The units of this value are the same as the units for the selected measurement in Measurement.
- Optional: Enter a value, in seconds, into the Pre-Record box if you want data to be recorded before the start condition is met. For example, entering 3 will cause the program to record the three seconds prior to the start condition being met. Leaving the box empty or entering 0 will cause the program to not pre-record any data.
- Select OK, then click Start
 . When the start condition is met, data will begin recording automatically.
Time based
Use this condition to set the amount of time by which data recording will be delayed after you click Start . For example, if you set a value of 5 seconds, data will automatically begin recording 5 seconds after you click the Start button.
- From the Experiment Screen, click .
- Click the box next to Sensor to select the sensor you want to create a start and stop condition for, or select Common Sample Rate if you want to set the same start condition for all sensors.
- Click Start Condition to open the start condition submenu.
- Click the box next to Condition Type and select Time Based.
- In the Time Delay box, enter the amount of time by which you want data collection to be delayed. The default unit for this value is seconds. To change this unit, click the box next to Units and select an option from the list.
- Select OK, then click Start . The clock will count down starting at your entered value, and data recording will begin when the clock reaches zero.

In-sensor triggering
In-sensor triggering provides the ability to record a short burst of data at a high sample rate over Bluetooth. When a condition is met, data is recorded in the sensor and then transferred to SPARKvue. This is necessary due to limitations in streaming large amounts of data over Bluetooth. This feature is supported on the following sensors:
To enable in-sensor triggering, click Yes next to the Trigger in the Sensor box under the start condition submenu. Note that this box only appears if you are setting the start condition on one of the compatible sensors listed above.
When using in-sensor triggering, you can also set a time based stop condition. If you do not set a time based stop condition, data recording will stop on its own after the sensor's memory is full. This will likely occur after around 0.5 to 2 seconds of data recording, depending on the sample rate. Due to the high number of samples being transferred, expect some lag as data is transferred from the sensor to SPARKvue.
Stop conditions
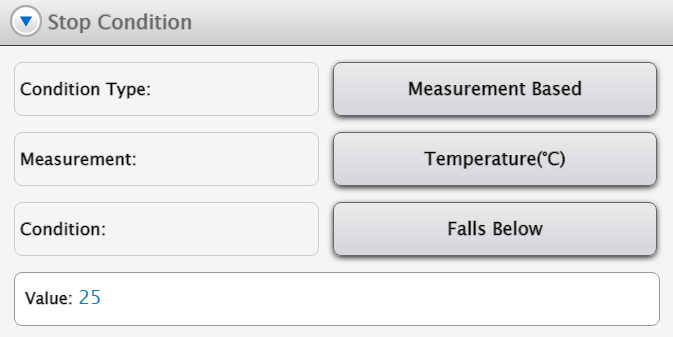
Measurement based
Use this condition to control when data recording stops based on a measurement value. For example, you can configure data recording to stop when a sensor measurement passes a certain value.
- From the Experiment Screen, click .
- Click the box next to Sensor to select the sensor you want to create a stop condition for, or select Common Sample Rate if you want to set the same stop condition for all sensors.
- Click Stop Condition to open the stop condition submenu.
- Click the box next to Condition Type and select Measurement Based.
- Select a measurement for the stop condition by clicking the box next to Measurement and selecting an option from the list.
-
Click the box next to Condition to select one of the following condition types:
-
Rises Above
Recording ends when the measurement changes from below the entered value to above the entered value.
-
Falls Below
Recording ends when the measurement changes from above the entered value to below the entered value.
-
Is Above
Recording ends when the measurement is above the entered value.
-
Is Below
Recording ends when the measurement is below the entered value.
-
-
Enter a Value for the condition. The units of this value are the same as the units for the selected measurement in Measurement.
- Select OK, then click Start . When the stop condition is met, data recording will automatically end.
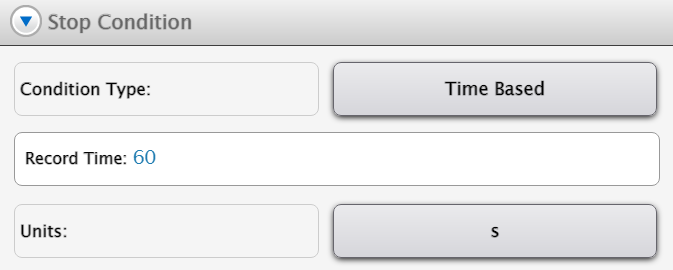
Time based
Use this condition to set the amount of time Capstone records data for after you click Record. For example, if you set a value of 10 seconds, data will record for 10 seconds after starting and then automatically stop.
- From the Experiment Screen, click .
- Click the box next to Sensor to select the sensor you want to create a stop condition for, or select Common Sample Rate if you want to set the same stop condition for all sensors.
- Click Stop Condition to open the stop condition submenu.
- Click the box next to Condition Type and select Time Based.
- In the Record Time box, enter the amount of time you want data recording to take. The default unit for this value is seconds. To change this unit, click the box next to Units and select an option from the list.
- Select OK, then click Start . Data will be recorded until the clock reaches the value entered for the stop condition.