Camera display
Capture and analyze still images from a webcam or digital microscope.
Accessing the Camera display
Connecting to the Camera display requires a different process than connecting to another sensor.
- From the Welcome Screen, select Sensor Data.
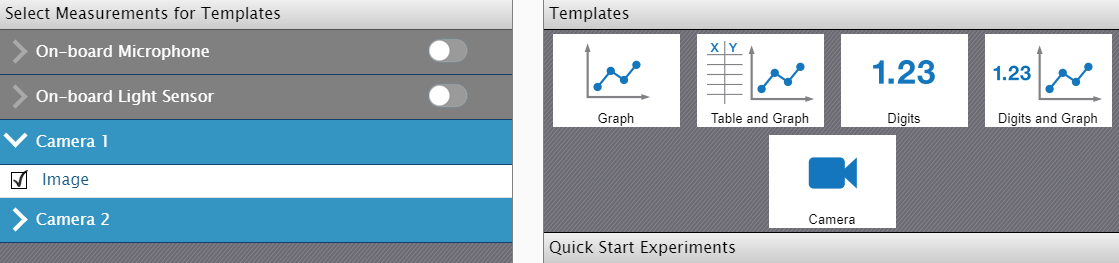
- Any webcams, compatible digital microscopes, or other cameras connected to your device will automatically be detected by SPARKvue and listed in the Select Measurements for Templates column.
-
Click the number for the camera you want to capture images from to open the dropdown, then click Image. A new Camera option will appear in the list of templates, as shown below.
-
Click Camera in the Templates column to enter the Camera display.
Features

-
Camera tools
-
 Preview
 Click to enable a live preview of the current camera view.
-
 Capture
 Click to capture a picture of what is currently on the screen, recording it as an image in the experiment.
-
 Zoom In and
  Zoom Out
 Click to zoom into or out of a captured image. While zoomed in, you can click and drag the image in the display window to pan around the image.
-
 Scale to Fit Tool
 Automatically rescale the image to fit the size of the window.
-
 Measurement Tool
 Create a calibrated measurement indicator to be displayed on top of a captured image, or remove a previously created measurement indicator.
-
 Drawing Tool
 Sketch a drawing to be displayed on top of a captured image, or erase a previously created drawing.
-
 Annotate Tool
 Create a text annotation to be displayed on top of a captured image, or remove a previously created text annotation.
-
 Properties
 Use the Camera Properties menu to change the camera being used as the image source.
-
-
Display Window
Images will be displayed here during previews and after capturing an image. You can also click this window during previews to capture an image.
-
Image Selector
Indicates the currently selected image. Click to select a different image to display.
Using the measurement tool
Creating and calibrating a measurement indicator allows you to compare the size of an object or portion of an object being studied with a known length.
Tip
When choosing an object of known length, use something with equally spaced markers, such as a metric ruler. A transparent plastic ruler works well for low magnification, while a calibrated slide is ideal for high magnification.
-
Capture an image which contains both the object or area you intend to measure AND the object of known length.
-
Click on Measurements
, then select in the top left to begin creating a new measurement. -
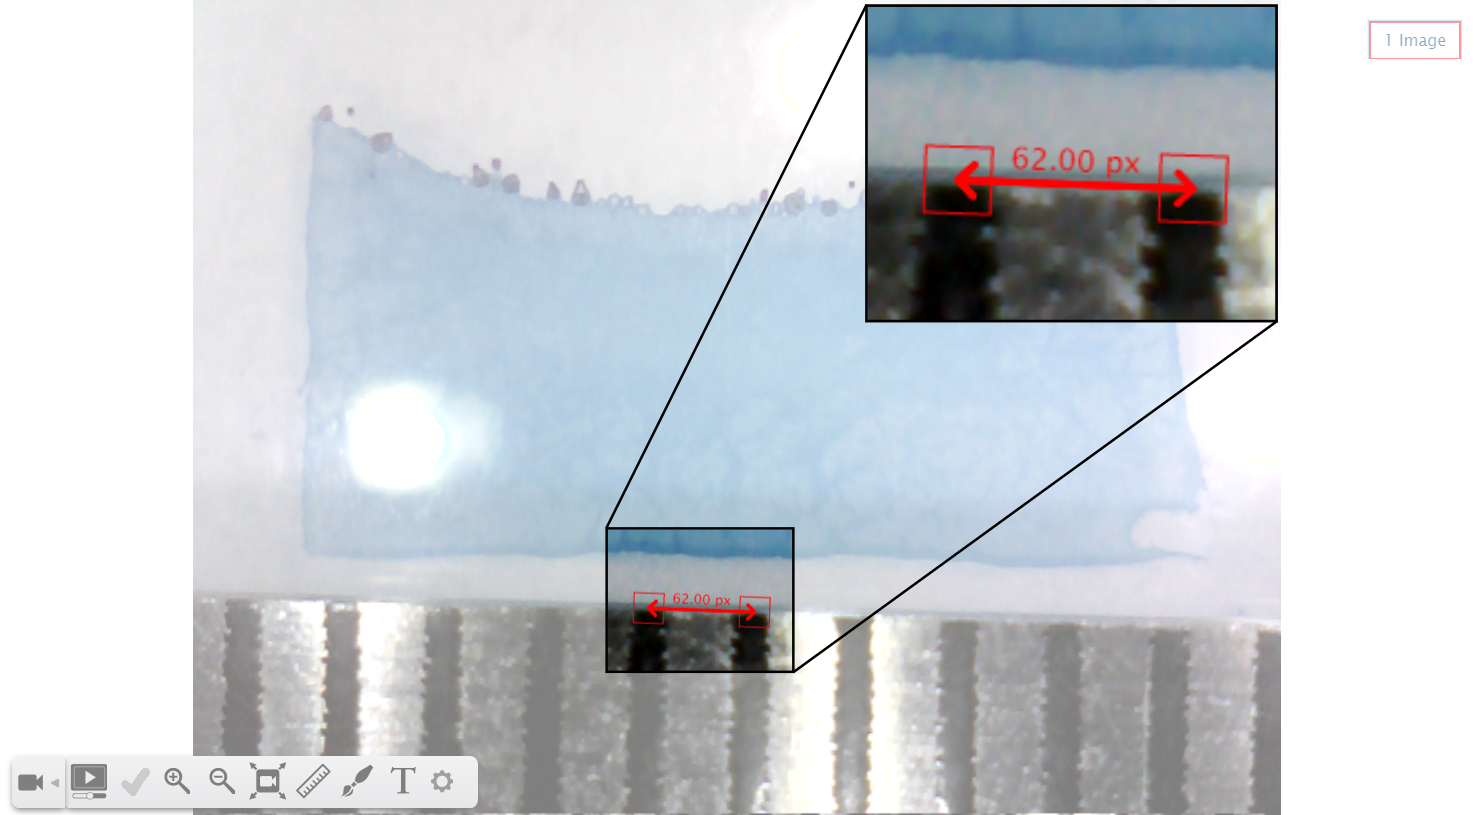
Click anywhere on the image to create a new measurement indicator; click and drag the indicator to reveal the other end.
-
Move the measurement indicator by clicking and dragging each end to the desired position; move the indicator so that it spans the object of known width, as seen above with the millimeter markings on a ruler.
Note
The image above shows the measurement indicator beginning and ending in the center of consecutive millimeter markings. When performing your measurement with a metric ruler, ensure that your indicator stretches from a given point on one marking to the equivalent point on the next marking (such as the left edge of one to the left edge of the next) to prevent inaccurate measurements.
Tip
If you are on a touchscreen-enabled device, try using a smart pen for greater precision in your measurements.
-
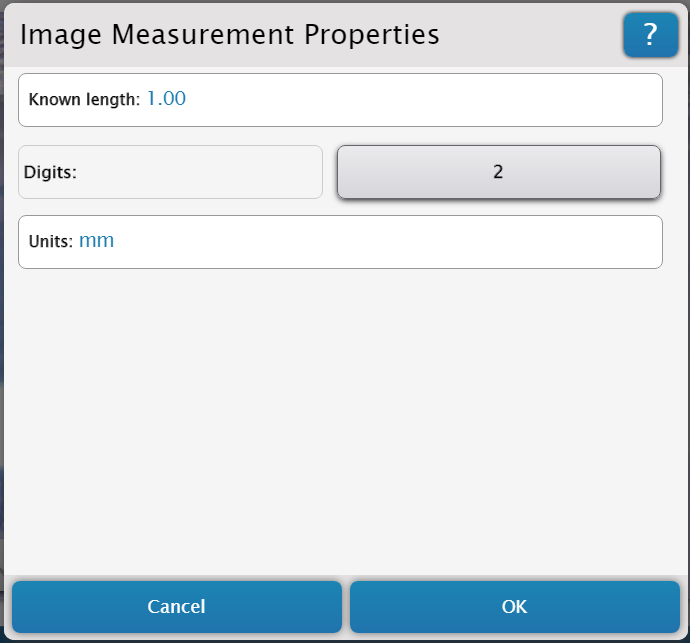
Double-click either end of the indicator to open the Image Measurement Properties menu, as seen below.
-
From this menu, set the value of your measurement based on its known length, changing both the numerical quantity and the units. For example, in the above example, we set the length of our calibration measurement to 1 and the units to mm, since we know that the length we are measuring is 1 millimeter.
-
When you are finished, click OK to return to the Camera display. The measurement indicator should now be set to your input in the Image Measurement Properties menu.
-
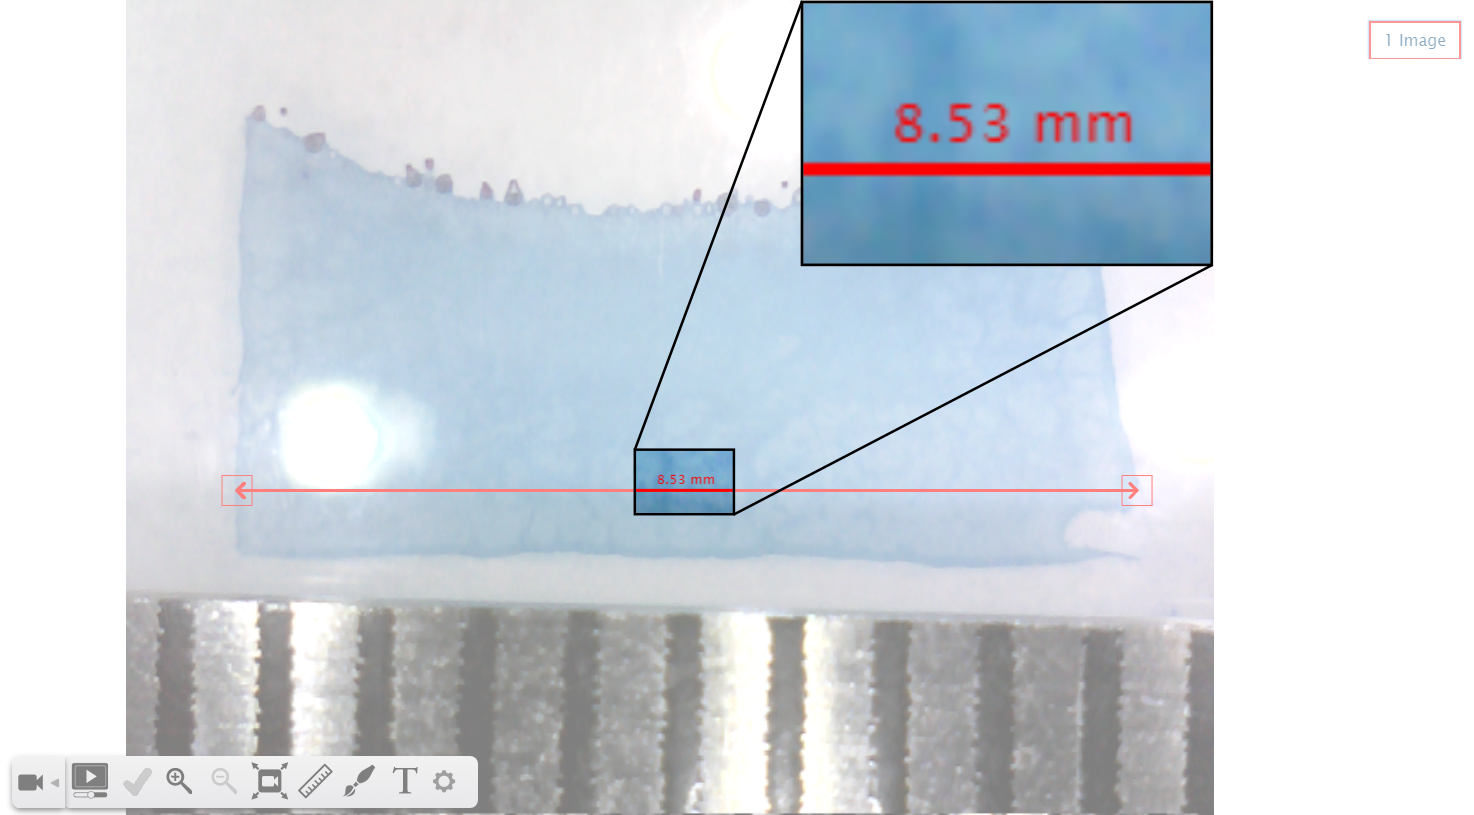
From here you can change the length and position of the measurement indicator, or add a new one. The indicator will automatically display its current length relative to what you entered, and any future measurements you add to the same slide will use the same calibration. For example, in the picture below, the indicator shows that the sample is approximately 8.53 millimeters in width (at the widest point) without having to directly measure it.
Note
Measurement calibrations are specific to images. If you wish to measure an object or area in a different image, you will have to repeat Steps 1 to 8 for that image.
To remove a measurement indicator, select from the Camera tools menu again, then select  and click on the indicator you wish to remove.
Troubleshooting and suggestions
- At present, connecting a camera to the Camera display is not possible on Chromebooks.
- If the camera you want to use does not appear on the list in the Sensor Data screen, or if it does not connect to the Camera display, follow the steps below to address the issue:
- If using an external camera, the connection may have come loose. Check to make sure the camera is properly connected; if it is not, reconnect it and try again.
- The camera may be in use by another program, making it temporarily inaccessible. Close any apps that could have connected to your camera, then try again to connect.
- When restarting SPARKvue or connecting a new camera, the numerical order of cameras in the "Select Measurements for Templates" list may change. If the camera you select does not display the image you expect, you can switch to the correct one from the Properties menu . In the Properties menu, click the current camera, then select a different one from the dropdown list to switch to it.