Control the Wireless Geiger Counter
Control the high voltage supplied to a Wireless Geiger Counter's Geiger-Müller tube to measure the count rate for different tube voltages. Plot count rate versus tube voltage to experimentally observe the Geiger plateau characteristics of the tube.
Note
If this is your first time using the Wireless Geiger Counter, see this video for advice on getting started.
Geiger Counter control panel
The Geiger Counter control panel can be accessed by the following steps:
- Connect your Geiger Counter to SPARKvue.
- Build a new experiment and select any layout with at least one section that spans the page vertically.
- In the section spanning the page, select
 to open the control panel.
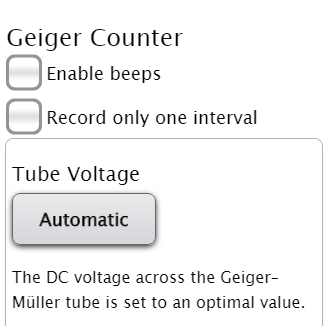
The DC Voltage across the Geiger-Müller (G-M) tube can be controlled using the "Tube Voltage" dropdown box. There are three settings that you can choose from:
-
Automatic
Select this option to have the voltage across the G-M tube set to an optimal value. This is the default option.
-
Manual Control
Select this option to manually set the voltage across the G-M tube using the slider.
-
Ramp
Select this option to automatically adjust the voltage across the G-M tube from a specified initial value to a specified final value. Both of these values can be adjusted using sliders. The software will automatically change the voltage by 8 V (one step on the slider) for each sample period specified in the sample rate. For example, if the sample rate is 30 seconds, the voltage will change by 8 V every 30 seconds. A checkbox below the sliders allows you to tell SPARKvue to automatically stop recording data when the ramp reaches the final voltage.
In addition to the Tube Voltage, the Geiger Counter Control Panel contains two additional settings, which can be toggled via checkboxes:
- Enable beeps: Prevents SPARKvue from suppressing the beep produced by the Wireless Geiger Counter when it detects a radioactive particle.
- Record only one interval: Stops data collection after the count has been measured for a single interval.
Note
The option to record only one interval is disabled when the Tube Voltage is set to Ramp mode.
Plot the tube's Geiger plateau
Use the Ramp option with a Graph display to plot Count Rate versus Tube Voltage.
- Set up your experiment with a radioactive sample to measure.
- Connect your Geiger Counter to SPARKvue, then return to the Welcome Screen.
-
Click Build New Experiment, then select the 1/3-2/3 layout.

-
For the 1/3 section, select
. For the 2/3 section, select  to create a Graph display.
 - Under "Tube Voltage", select Ramp, then set the Initial DC Voltage and Final DC Voltage using the sliders.
- Select the checkbox to stop recording data when the Final DC Voltage is reached.
- If desired, adjust the sample rate for the sensor.
- When you are ready, click Start
 to begin recording data. Data recording will automatically end when the Final DC Voltage is reached.