Set up a time of flight timer
Use this timer to measure the time it takes for a launched projectile to reach the floor and the initial speed of the projectile.
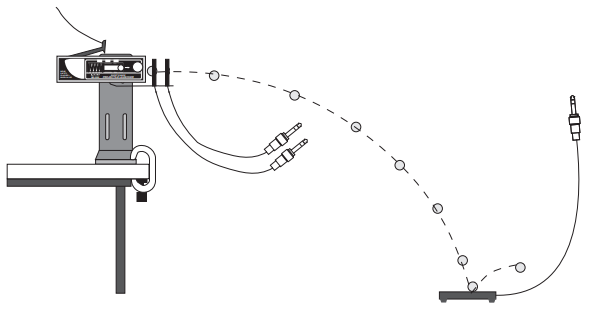
Equipment setup
-
2× Photogates
Use a Wireless Smart Gate (PS-3225), a Smart Gate (PS-2180) with a PASPORT interface, or two Photogate Heads (ME-9498A) with a digital interface.
-
Time-of-Flight Accessory (ME-6810A)
Place the accessory on the floor as shown in the image below.
-
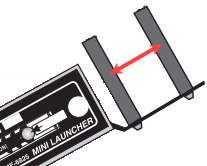
Projectile Launcher with Photogate Mounting Bracket (ME-6821A)
Use either the Projectile Launcher (ME-6800) or Mini Launcher (ME-6825B) with a Photogate Mounting Bracket attached. Attach the photogates to the bracket as shown below.
Set up the timer
- Connect the Smart Gate, Wireless Smart Gate, or Photogate Heads to SPARKvue.
-
Connect the Time-of-Flight Accessory to SPARKvue using the appropriate method for your photogate(s).
- If you are using a Smart Gate or Wireless Smart Gate, plug the digital jack of the Time-of-Flight Accessory into the Auxiliary Port of the Smart Gate or Wireless Smart Gate.
- If you are using two Photogate Heads, connect the Time-of-Flight Accessory to the same interface as the photogates via another digital input.
-
Under Select measurements for templates, select the Properties
 icon next to the photogate's name, or next to the digital interface's name if using a Photogate Head.
 - Select Two Photogates and Device or Smart Gate and Auxiliary Port, select Time of Flight, then select OK.
-
Enter the Photogate Spacing. This is equal to the distance between the photogate beams. SPARKvue enters the value automatically when using a Smart Gate.
-
Check the boxes
 next to the measurements you want to display.
 - Select a template to display the selected measurements.
Record data
Select Start  , then launch the projectile. The timer starts when the projectile goes through the photogates and stops when it hits the Time-of-Flight Accessory.